
Saturday, February 23, 2013
My New Bag
Thanks to this easy to follow tutorial at Elm Street Life, I have a new bag. I made the 12"x10" version. It turned out pretty well, I think!

Friday, February 22, 2013
When Mistakes Go Right
I'm very good at starting projects...and for the most part, I'm pretty good at finishing them. However, if a crochet project has more than one piece (slippers, socks, etc.), it's pretty much a toss up as to whether or not the second piece ever gets made...this poor cowl scarf has the same sad story. I saw this Lace Persimmon Cowl on Ravelry and bought the pattern a few months ago.
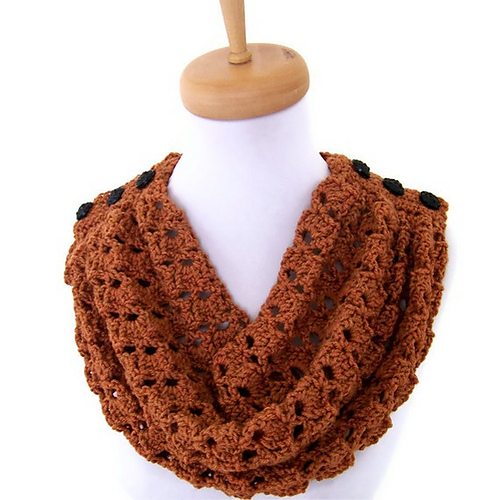 |
| © 2012 by Susan Enders |
It wasn't until after I sewed my two pieces together, that I really looked at the pattern again. I had missed the part that said the second section was only about half the length of the first...oops! I had wondered why mine didn't quite look like the picture in the pattern...I tried to figure out how to take the cowl apart again so I could make the back the right size. Ugh, too much work! Especially, since I had JUST finished making that second piece. So, instead I played around with my new infinity scarf...and you know what? I really like it! It's very versatile...and the two "shoulder seams" give it some visual interest and make it lay really nicely. I'm planning on trying again (hopefully it won't take three months) to make the cowl the intended way, but for once, I'm really glad I didn't read all the directions!
Here are a few ways I've found to wear my new infinity scarf...
As a long infinity scarf with the "shoulder seams" at the top and bottom - I like that this makes it feel less bulky around my neck...

Wrapped twice with the "shoulder seams" at the back on the neck - again with the less bulky thing...

Here's the scarf wrapped around twice with an added flower pin.

With the pin to the side...

As a long infinity scarf with the flower pin below one shoulder...

As a long infinity scarf with the "shoulder seams" asymmetrical...

I tried wearing it with the"shoulder seams" parallel to each other, but it's a bit awkward looking due to where they fall...I felt like it was saying "Please look at my boobs" - not really the impression I want to give :)
Looking forward to wearing this one soon!
I love it when mistakes go right!
Fishnet Infinity Scarf with Flower Detail Tutorial

This scarf came to be one night after seeing this scarf at Macy's. I thought it was cool looking, but I wasn't sure I was willing to pay $44 for it. (I did eventually buy it during the holidays when it was on sale...can you say, sucker?) Anyways, after I came home that night, I sat around and thought about it...How was it made? Could I crochet that? Then I had an idea! I grabbed some scrap knit fabric, told my husband I would not be watching whatever TV show we were supposed to watch that night because "I must be creative!". Twenty minutes later, I had a super cool scarf that I still proudly wear! It's very loosely based off the Macy's scarf I saw (and now own).
Now, you can make one too!
Please excuse the picture quality - my house is not natural light friendly, nor is the time I am able to craft - aka after bedtime :)
Materials:
spandex knit fabric - I got mine as a remnant at JoAnn's. I like this fabric because it doesn't fray.
something to cut your fabric with - I used a rotary cutter
a cute button - I think mine was an extra button for a tweed-ish jacket.
hot glue gun, or needle and thread
scissors

Step 1: Cut your fabric into 14 1.5" strips. These do not need to be perfectly straight.


Step 2: Tie the strips together into 7 pairs. Leave about 2" of fabric above the knot.

Step 3: Pin your fabric strip pairs to the wall. Use corkboard to prevent holes (I was in such a hurry the first time I made this scarf that I already have holes in the wall, so I just continue to use those)

Step 4: Tie strips 2 and 3 together about 2" below the first knot. Yes, just leave strip 1 hanging there.
Step 5: Tie strips 4 and 5 together.
Step 6: Tie strips 6 and 7 together.
Step 7: Tie strips 8 and 9 together.
Step 8: Tie strips 10 and 11 together.
Step 9: Tie strips 12 and 13 together. Just leave strip 14 hanging there.

Step 10: Tie strips 1 and 2 together about 2" below the second knot.
Step 11: Tie strips 3 and 4 together.
Step 12: Tie strips 5 and 6 together.
Step 13: Tie strips 7 and 8 together.
Step 14: Tie strips 9 and 10 together.
Step 15: Tie strips 11 and 12 together.
Step 16: Tie strips 13 and 14 together.

Continue alternating in this way until you have tied knots down the length of the fabric. Leave 2" of fabric after the last row of knots. (It helps if you add another row of pins halfway down to secure your scarf to the wall.) Essentially, you're tying diamonds. Don't worry if your rows aren't even. In the end, it won't matter at all.


Before Trimming After Trimming
Step 17: When you have finished tying all your knot, gather the ends of both sides together. Use a small strip of fabric and tie the ends securely together above the knots. This will become your flower detail.

Step 18: Fan out the ends so they slightly resemble a flower. Pull and twist them into a shape you like. Give the ends a trim to get the right shape. Glue or sew the button into the center. Then trim the ends again (I usually cut them shorter near the middle, and leave them longer on the edges - you might also want to put the scarf on and trim the ends so you can see how the flower "petals" will lay).

Step 19: Put the scarf on, positioning the flower detail just below your shoulder. Run to the nearest mirror and admire yourself!

If you make this scarf, I would love to see pictures! If you love the scarf, but don't want to make it yourself, I would be happy to make one for you. Check it out at my etsy shop.
Tuesday, February 19, 2013
Swapping Talents
One of my favorite things about crafting, is trading my talents with other people. I have a friend who is an AMAZING photographer, and we have swapped talents a few times. I make crocheted things (usually hats) for her kids and her business, and she takes our pictures. We both think we're getting the better end of the deal, so it works out perfectly!
A couple weekends ago, she took pictures for Elijah's 2nd birthday. We went to some old abandoned train tracks armed with balloons and toy trains and had a great time! For the first time in the 2 years she's been taking our pictures, it wasn't rainy, misty, drizzly, or wet! In February! Amazing! We had such perfect light for most of our session that she e-mailed me to ask if instead of doing a mini-session like we had planned, if I wanted the whole batch of pictures. Of course, I want the whole batch! We decided to make up the price difference by having her order some more things. First up, a flower scarf for her! This is the first time I'm actually making something just for Cassandra, and I started right away.
Cassandra's husband bought her a flowered scarf for Christmas, and she wanted another one, but in more saturated colors. I dug through my bag (ahem, bags) of yarn and pulled out all the jewel toned yarns I had - it was quite the pile! I decided on two different flower types, both from this book. First, I picked the 5 point flower but I tweaked it a little - I added a petal, and took out the picot points.
I started the flowers right away. A new project can not be put on hold while I finish other things...you know, like laundry and dishes. No, the creativity must be allowed to flow! :)
The5 6 point flowers worked up really fast. I finished these 12 in a couple of days. Really, it should only have taken a couple of hours, but the whole laundry, dishes, making dinner, taking care of my kid stuff can get make things take longer than I would like...Then I made another set of the same flowers, only I switched to a hook two sizes larger, so I would have some flowers that were bigger. Here are all the flowers strewn about - I love how all the colors play off each other.


Next, I sewed all the flowers together using needle and thread. Yes, I know I could have joined them as I went, but I like being able to look at all the flowers I've made and decide on an order that is pleasing to the eye. This was especially inmportant since I was haphazardly choosing the colors as I made each flower. I really wanted to give it a "scrappy" look, kind of like that crocheted granny square blanket on the back of your Great Aunt Mildred's couch. (Anyone actually have a Great Aunt Mildred?). I'm quite pleased with how it turned out, and I hope Cassandra is as well!

A couple weekends ago, she took pictures for Elijah's 2nd birthday. We went to some old abandoned train tracks armed with balloons and toy trains and had a great time! For the first time in the 2 years she's been taking our pictures, it wasn't rainy, misty, drizzly, or wet! In February! Amazing! We had such perfect light for most of our session that she e-mailed me to ask if instead of doing a mini-session like we had planned, if I wanted the whole batch of pictures. Of course, I want the whole batch! We decided to make up the price difference by having her order some more things. First up, a flower scarf for her! This is the first time I'm actually making something just for Cassandra, and I started right away.
Cassandra's husband bought her a flowered scarf for Christmas, and she wanted another one, but in more saturated colors. I dug through my bag (ahem, bags) of yarn and pulled out all the jewel toned yarns I had - it was quite the pile! I decided on two different flower types, both from this book. First, I picked the 5 point flower but I tweaked it a little - I added a petal, and took out the picot points.
I started the flowers right away. A new project can not be put on hold while I finish other things...you know, like laundry and dishes. No, the creativity must be allowed to flow! :)
The


Arranging the Flowers
Next, I sewed all the flowers together using needle and thread. Yes, I know I could have joined them as I went, but I like being able to look at all the flowers I've made and decide on an order that is pleasing to the eye. This was especially inmportant since I was haphazardly choosing the colors as I made each flower. I really wanted to give it a "scrappy" look, kind of like that crocheted granny square blanket on the back of your Great Aunt Mildred's couch. (Anyone actually have a Great Aunt Mildred?). I'm quite pleased with how it turned out, and I hope Cassandra is as well!

All packaged up and ready to go!
Wednesday, February 13, 2013
Bug Eating
Talking about food is always interesting in a multi-cultural environment. In fact, the only thing we all seemed to agree on today in class was that eating babies is bad (it was a strange, strange, twisted road that got us to that conclusion). One student would say that eating dog is strange, another would reply that dog is delicious...same for horse, cat, rat, and even scorpion. It was an interesting conversation indeed, and as a teacher in a multi-cultural environment, you learn to keep your initial reactions to cultural things under wraps...
"Oh, you eat dog? Interesting..."
"You had donkey? What did it taste like? It tasted like horse? Yeah, that doesn't really help me..."
"Your military eats scorpians in the desert? Doesn't the venom make them sick?"
"Eating live frogs? Wouldn't they jump around in your stomach?"
Yes, all of these sentences actually came out of my mouth today...
As a person with an incredibly strong gag reflex, I have a hard time stomaching these kinds of conversations without letting my true feelings (and possibly my lunch) out. So, why do I do it? It's interesting (in theory), the students are almost always engaged, and our current textbook has a reading on bug eating...okay, so mostly it was the last reason. :)
Want to know more about bug eating? Check out this article I had my students read tonight for extra credit.
And remember, everyone agrees that eating babies is bad...
Tuesday, February 12, 2013
Wait, what?!
So, during that time that I'm not being crafty, I teach English as a second language to international students at a community college. I love my job, and most days I learn or hear something that makes me say "Wait, what?!"
For example, earlier this quarter, I learned that in January large apartment companies in Riyadh and Dubai offer a sale where if you buy an apartment, you get a car for free. Cool, huh? And it's not just any car...last year it was a Lamborghini...this year is was an Audi...talk about incentive to buy!
I also had this conversation with a student a couple of weeks ago:
Me: So, what do you think would be a cool job?
Student: I want to sell things.
Me: Sell things? What kind of things?
Student: You know...guns, oil...narcotics...
Me: Did you seriously just tell me that you want to be a drug dealer!?
Today's little gem was this...
We were getting ready to read a passage about how McDonald's changes its menus to match the local preferences (specifically how it offers vegetarian and mutton options in India), so we were discussing what things you can buy at a McDonald's in my students' countries that you can't buy here in the states. To help facilitate discussion and ideas, I pulled up the McDonald's websites from all the countries represented in class. I liked the Saudi Arabian site because they had an English version. The first thing that caught my eye was "McDelivery". Wait, what?! I asked my students about it, and they all responded that McDonald's delivers in their country (Saudi Arabia, Korea, and China)...and that delivery is free...and they don't have to tip the deliveryman...
Now, I'm not suggesting that McDonald's here should deliver...but wow...
I should also add that in China, a Big Mac meal costs about $3 total. Any one else feel like we're getting a little shafted here?
Stay tuned for more "Wait, what?!" moments...
Monday, February 11, 2013
Elijah's Birthday Presents
My son, Elijah, LOVES the cartoon Chuggington. I will hear my crazy kid in his crib at 4am saying "Mama, mama...choo-choo?" Translation: Hey, Mom? Can I watch Chuggington? No, kiddo, sorry, no Chuggington at 4am. Now, while I much prefer Chuggington over, say, Thomas the Train (seriously, does anyone else find those trains a little creepy?), it can be really hard to find merchandise. Toys R Us sells the train sets, but for things like clothes and shoes with the characters on it, I would have to order them from England...and pay HUGE shipping costs...no thank you. So instead, I have taken to making them myself.
One day last November, while walking aimlessly around JoAnn's, I came across some Chuggington themed fabric - score! Since I didn't have a project in mind, I just got one yard each of the three different fabrics - 1 cotton, 1 flannel and 1 fleece. I knew I would figure out something to do with them.
Side Note - Elijah was with me during this trip and kept yelling "choo-choo" at the fabric, and now when we go to JoAnn's, he runs right to where the Chuggington fabric is (well, after stopping to touch all the strands of beads in the front of the store). He's got a great memory!
For Christmas, I used the flannel to make a pillow case, and I put a crochet edge around the fleece to make a blanket. (I used this nifty tool that I discovered on the Project Linus website) Both items are currently in Elijah's crib and he loves them.
Now, I had been staring at the cotton fabric for a few months and I finally decided what to do with it. I was going to make pajama pants! I had never made them before...in fact, I don't think I had sucessfully followed a clothing pattern before...but, I decided to give it a whirl! I picked up the pattern below during a $1 pattern sale at JoAnn's.
The pattern looked simple enough - cut 4 pieces, sew them together, add some elastic, and hem. I could do that! Then I stared at the pattern packet for a few days. Anyone else hate cutting out patterns and then trying to fold that tissue thin paper back into it's original shape?
One night, I had had enough staring. I took the pattern and my fabric and got to work! And it was easy! It really was cut out 4 pieces, sew them together, add some elastic, and hem! Now, the pattern is meant for boys, and Elijah is still a toddler, so the pants are a little long (should have done the shorts!), but at least he'll be able to wear them for a while.

I tried them on him the other day and he skrieked in delight and kept pointing to all the trains (mostly the ones near his crotch, which is what he's doing in the picture). He won't get them until his birthday next weekend, but I HAD to see if they fit. Pretty proud of myself...and I see more homemade pajama's in Elijah's future. (In fact, I just picked up a remnant of some Cars fabric...my little boy also love "Maymay".)
Side note - I scored a Chuggington dish set and book at TJMaxx for $10 the other day!
Side note - I scored a Chuggington dish set and book at TJMaxx for $10 the other day!
Thursday, February 7, 2013
Saviour of the World - Techno Remix
My husband has remixed the song Saviour of the World by Ben Cantelon. This is what I've been listening to while being crafty the last couple of weeks...I don't really have a choice - we share an office/studio :) It's pretty catchy - check it out!
Monday, February 4, 2013
Scrapbook Paper Embroidery DIY
I remember one summer at a family picnic hearing the story about how when one of my uncles was dating my aunt, he carved their initials into a tree at the park we were at. Of course, my cousins and I HAD to go searching for it...but no luck...the initials were no where to be found. Although, now that I'm an adult with my own kid, I have my suspisions that they told us the story to send us off on a wild goose chase. Either way, it's a fun memory of good times spend with my cousins, and this project stems from that.
The day I thought of this project, I went and looked for wood grain paper to match the "initials carved into a tree" thing. Alas, it was not meant to be that day, and as I have no patience when the creative bug hits, I went with a wood fencing design that reminded me of the pier in my hometown where LOTS of name and initials (and other unsavory phrases) are written.

Want to make your own? Here's how!
Materials:
Scrapbook paper - wood grain, fencing, burlap (really, anything you like)
Cardstock - in case your scrapbook paper is the thing kind like mine was
Embroidery Thread
Straight Pin
Needle
Pencil
Picture Frame
Step 1:
Cut your scrapbook paper to the size you want it - I did 4x6.
Step 2 (optional):
Cut a piece of cardstock the same size and glue it to the back of the scrapbook paper. Let dry. I stuck mine between two books on a bookshelf so it would dry flat.
Step 3:
Draw your design on the paper lightly in pencil. I usually print off the imagine that I want, scribble over the back of it in pencil, and then trace the image onto my scrapbook paper so that the lead on the back of the image transfers onto the paper.


Using two strands of your embroidery thread, back stitch around your entire design. I have found it's easier to punch holes around the design with the straight pin and then go back and back stitch.


 Note: While I like the peach embroidery thread up close, because it really does more closely remember carved wood, I don't recommend it - it's hard to see from more than 5 inches or so away :) Normally, I would use white, but when making this tutorial, I had peach on hand so that's what the impatient me used :)
Step 5:
Put your paper into the frame of your choice, stand back and admire your handiwork. Then give it your your significant other for Valentine's Day...or to friends as a wedding gift...change the design and the possiblities are endless.

Obviously, my husband and I now share the same last initial, but it seemed like more fun to use my maiden name...plus James is not my husband's legal name...so, really...it's a lie no matter how you look at it :)
The day I thought of this project, I went and looked for wood grain paper to match the "initials carved into a tree" thing. Alas, it was not meant to be that day, and as I have no patience when the creative bug hits, I went with a wood fencing design that reminded me of the pier in my hometown where LOTS of name and initials (and other unsavory phrases) are written.

No trees or piers were harmed in the making of this "carving"
Want to make your own? Here's how!
Materials:
Scrapbook paper - wood grain, fencing, burlap (really, anything you like)
Cardstock - in case your scrapbook paper is the thing kind like mine was
Embroidery Thread
Straight Pin
Needle
Pencil
Picture Frame
Step 1:
Cut your scrapbook paper to the size you want it - I did 4x6.
Step 2 (optional):
Cut a piece of cardstock the same size and glue it to the back of the scrapbook paper. Let dry. I stuck mine between two books on a bookshelf so it would dry flat.
Step 3:
Draw your design on the paper lightly in pencil. I usually print off the imagine that I want, scribble over the back of it in pencil, and then trace the image onto my scrapbook paper so that the lead on the back of the image transfers onto the paper.

2-layer scrapbook paper and printed design

Back of printed design

After tracing

Ready for stitching
Step 4:Using two strands of your embroidery thread, back stitch around your entire design. I have found it's easier to punch holes around the design with the straight pin and then go back and back stitch.

Punching holes with straight pin

Held up to a window

Halfway done
Embroidery complete!
Step 5:
Put your paper into the frame of your choice, stand back and admire your handiwork. Then give it your your significant other for Valentine's Day...or to friends as a wedding gift...change the design and the possiblities are endless.

Our "wood carving's" new home on one of the bookshelves in the studio/office
See, you can barely see what it says...oh well, live and learn!
Obviously, my husband and I now share the same last initial, but it seemed like more fun to use my maiden name...plus James is not my husband's legal name...so, really...it's a lie no matter how you look at it :)
Subscribe to:
Posts (Atom)