Thursday, March 27, 2014

DIY Pride and Prejudice Book Cover Pendant

Like many women out there, Pride and Prejudice is one of my favorite classic books. I decided to make a pendant using my favorite cover of the book - the peacock one. It took all of about 5 minutes (plus drying time).


Materials:
Rectangle Bezel - I found mine at Hobby Lobby
Printed picture of book cover, shrunk to the correct size to fit in your bezel (Google and Word)
Mod Podge Dimensional Magic

Directions:
  1. Cut out the book cover picture to fit in your bezel.
  2. Cover the picture with Dimensional Magic.
  3. Use a small needle or pin to remove any air bubbles (make sure to get any air out from underneath your picture -
  4. Let dry for 24 hours.
  5. Put your new pendant on a chain and proclaim your literary love to the world.
I'm planning on wearing mine on the first day of class next quarter (since I do teach reading and writing). In fact, I'm considering making a whole bunch of them (of different books, of course) and making a game out of it for my students. Perhaps extra credit if they can tell me one thing about the book I'm wearing. Now to pick out what other books I would want to do...

Choices, choices...

Izzy Cowl by PurpleStarDust

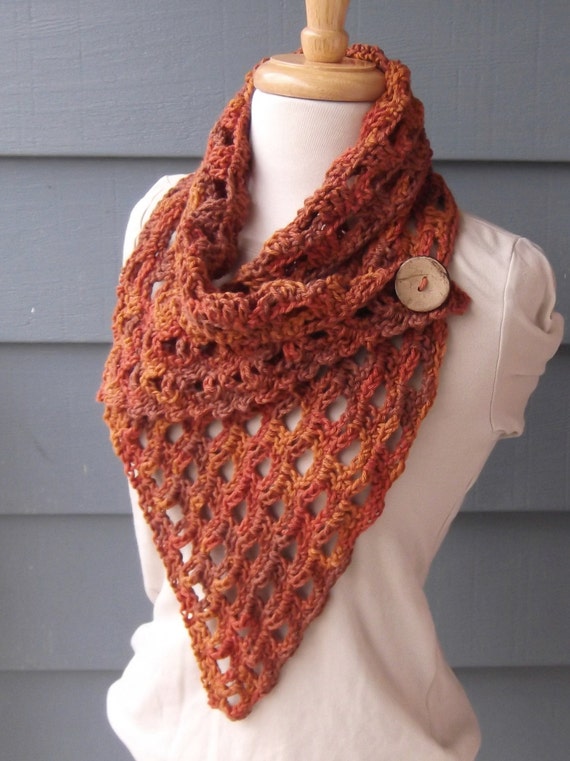
So, while searching the latest and greatest on Ravelry the other night, I came across this cute cowl:
Make This Yourself - Crochet PATTERN - Instant PDF Download - IZZY Cowl with Large Button
PurpleStarDust
I hardly ever buy crochet patterns, as I can usually look at something and figure out how to make it. This one had me a little stumped, so I bought the pattern. It's super easy, and I love it! I made mine with scrap worsted weight yarn I had in my stash, and a mirror-like button that I picked up at our new Hobby Lobby (5 minutes from my house...good/not good). Here it is.
 
 
I wore it out to dinner the other night after I finished it. I like the way it looks, but I had to fidget with it a bit throughout dinner to keep it straight. I think I'm actually going to stitch it into place so it doesn't go all wonky while I'm wearing it. I'm a little OCD about that kind of stuff.
 
All in all, an easy enjoyable pattern that I recommend.

Friday, March 21, 2014

Spring Break is Here!

Whew! The quarter is finally over. I have to admit, this was one of the toughest quarters I've had in my 7 years of teaching. I'm pretty wiped, and so looking forward to a short break. My break officially started yesterday, and I spent the day working on a wrist warmer pattern. However, once I was done with it and put it on, I wasn't a fan of how it fit. So, what was I going to do with one wrist warmer? I put it on vase and called it good! I actually really like it, and am thinking about getting some flowers to put in it to liven up our living room.


I've spent my daycare freedom today getting caught up on posting patterns here on the blog - check out the last two posts.
 
Next week, I plan to do a lot of nothing, take my kid to the zoo and the beach (if our weather cooperates), and get some things organized around the house (file box of bills and pay stubs - I'm looking at you!). I'm also hoping to have another pattern or two to share with you, so come back and visit!

Baby Bird Earflap Hat

I love this hat that I designed for Matthew and Janine's baby girl.


Materials:
aran or worsted weight yarn in main color (I used Red Heart With Love in Bubble Gum), black and yellow (very small amounts, from stash)
I hook
yarn needle

Hat Pattern:
First, go make a basic beanie in the size you want. Add earflaps using the pattern below (for a size M, use information from the beanie pattern to alter for your size).

First Ear Flap:
 Row 1: ch 2, dc in next 7 stiches, turn (8 stitches)
 Row 2: ch 2, dc2tog, dc in next 4 stiches, dc2tog (this will include the beginning chain), turn (6 stitches)
 Row 3: ch 2, dc2tog, dc in next 2 stitches, dc2tog (this will include the beginning chain), turn (4 stitches)
 Row 4: ch 2, dc2tog, dc2tog (this will include the beginning chain) (2 stitches), fasten off.

Making Second Ear Flap:
With right side facing, count 22 stitches from the edge of the first ear flap. Join yarn and repeat directions for First Ear Flap, but do not fasten off, sc around the bottom of the hat to finish. Fasten off, weave in ends.

Braids:
To make braids for the ear flaps, cut 6 30" pieces of each yarn color. For each ear flap, you need 12 pieces of yarn. Gather the 12 yarn pieces and fold them in half. Insert the center loop into the ear flap from the front. Pull the ends of the pieces through the loop and tighten. Separate the strands into 3 groups of 8 and braid them. Finish with a knot at the end.

Eyes: (make 2)
With black, in magic circle, 8sc, join with a slip stitch, fasten off, but leave a long tail to sew on

Beak:
With yellow, ch 5
Row 1: sc in 2nd ch from hook, sc across (4)
Row 2: ch 1, 2 sc tog, 2 sc tog (2)
Row 3: ch 1, 2 sc tog (1)
Row 4: sc around, 3 sc in each corner to prevent curling, fasten off, leave a long tail to sew on

Finishing
Sew eyes and beak onto the front of the hat, add a tuft of yarn to the top (pull yarn pieces through one of the stitches at the top and knot, trim so they are all the same length)

Cluster Stitch Baby Blanket Pattern

Here is the pattern for the baby blanket that I made for Matthew and Janine's soon-to-arrive baby girl. This blanket measures 37" square, but can be adapted to any size.


Materials:
Aran Weight Yarn - I used almost 2 skeins of Caron One Pound in Grey
J hook

Ch. 104 (odd number + 3)
Row 1: 3 dc tog in 4th chain from hook, ch 1, skip 1 stitch, *3 dc tog in next stitch, ch 1, skip 1 stitch, repeat from * 49 times (51 clusters)
Row 2: ch 3, *3 dc tog in chain space of previous row, ch 1, reapt from * 50 times (51 clusters)
Row 3-62: repeat Row 2
Row 63: sc across - 1 in each cluster and 1 in each ch space (101 sc), fasten off
Row 64: sc across the opposite side of the beginning chain, 1 in each cluster and 1 in each ch space (101 sc), fasten off


Edging (optional)
Using a contrasting color, make a shell stitch (5 dc in the same space) in each ch 3 space along the unfinished edges and in every second space along the top and bottom. I ended up with 26 shells along the top and bottom and 31 along the sides (114 shells)

Friday, March 14, 2014

Matthew and Janine are having a GIRL!

Our close friends, Matthew and Janine, just found out their first baby is a little girl! I have to admit, I was a little disappointed at first because I was so looking forward to pawning off all of Elijah's baby clothes on them, but I really am looking forward to meeting the little girl when she arrives sometime in July.

Matthew was one of the groomsmen in our wedding, and Janine was the first person outside of family to meet Elijah after he was born (she was a nurse at the hospital where he was born and was working, so she came up after visiting hours). They are two of Elijah's favorite people in the whole world. He's always asking to see Uncle Matthew and Auntie Janine (only they sound like Ma-You and Jakameen). Matthew plays guitar, and Elijah has decided that all guitars everywhere belong to Matthew, and no one else is allowed to touch them - any of them! We often meet up with them for dinner, and are looking forward to the day when we aren't the only ones chasing an unruly child around the restaurant :)

After a little Pinterest stalking, I discovered they were planning on a pink and grey bird theme for a girl's nursery, so that is what I based my "It's a girl!" gift on.

Here is what they're getting:

A crocheted blanket.

 
I started with the grey blanket when I found out they were pregnant, and added the pink border when they announced the gender. This is a simple double crochet cluster blanket with a shell stitch border. I will post the pattern another day.

A crochet bow beanie to match the blanket, a crochet bird earflap hat (pattern in the works!) and a cute birdie outfit with a couple of hair bows that I picked up at Carter's.


As well as four burp clothes that I just whipped up.


These are simply cloth diapers with a fabric panel sewed on to the center.

Congratulations, Matthew and Janine! We can't wait to meet your little girl! (And I'm totally going to pawn off all the gender neutral stuff I have on you guys!)

Wednesday, March 5, 2014

DIY Elastic Notebook Closure and Crochet Loopy Flower Pattern

I carry a notebook around with me practically everywhere I go. I use it to jot down ideas, keep track of things that happen each month, organize my non-Etsy orders, and to document my crochet patterns. It's a simple journal, nothing spectacular, but I love that it says "Super Awesome Ideas" on the front. I'm forever tossing bits of paper in there, so I wanted to find a way to keep it closed in the hope that my bag doesn't get littered with all those bits of paper. I'm trying to avoid losing the world's next great idea in the abyss that is my purse :)

Here's what I came up with. It's simple and super quick.

Materials:
  • notebook
  • elastic (I got this awesome gold stuff from JoAnn's)
  • button
  • needle and thread

Directions:
  1. Wrap the elastic around your notebook from top to bottom, and tighten just a little so it has to stretch. Cut.
  2. Put the two ends together, and using a zigzag stitch, sew into a loop.
  3. Repeat steps one and two for the width of the notebook.
  4. Cross the seams of the two elastic loops together and sew diagonally through all the layers.
  5. Hand sew the button over the seams to cover them
  6. Put on your notebook and adjust to your liking.

That's it! It took me about 5 minutes to make, and that's my favorite kind of project!

I kind of wish the elastic was a little thinner so it doesn't get bunched up in the binding, but the sparkly gold color totally makes up for it!

UPDATE: I looked at my notebook this morning, and it was missing something. I happened to have some blue yarn next to me and I decided to work up this simple little loopy flower to add to the button. Much better!


Pattern:
Ch. 6, join into a loop with sl st (I found this to be a little tight to go around my button, so you  might want to increase or decrease beginning chain based on the size of your button)

Round 1: *ch 8, sc into loop, repeat from * 11 more times (or as many times as number of petals you want), fasten off and weave in ends.


Tuesday, March 4, 2014

Spicy Mexican Chicken Soup aka Mexican Dump Soup

Here is a simple, easy, pantry-stash-busting soup. It is delicious and perfect for a cold, rainy, Western Washington day (like today). I call it Mexican Dump Soup, because I really just dump whatever we have on hand into the pot, so it's always a little different, but it's always good.

Ingredients:
  • 1 lb cooked chicken (I used tenders)
  • 1 medium onion, diced
  • 1/2 green bell pepper
  • 2 tbs oil
  • 1/4 tsp cumin
  • 1/2 tsp chili powder
  • 1/2 tsp salt
  • 1 tsp black pepper
  • 1 tsp garlic powder
  • 1 tbs dried parsley
  • 1 tbs dried oregano
  • 1 tbs lemon juice
  • 1 clove garlic, chopped
  • 1/2 jar chunky salsa (I used medium)
  • 1 small can green chilis
  • 1 can diced tomatoes
  • 1 can condensed tomato soup
  • 1 can whole kernel corn, drained
  • 3 cans low sodium chicken broth (or make your own)
  • 1 cube chicken bouillon

Directions:
  1. Cook the onion and bell pepper in the oil until tender. Add in the fresh garlic.
  2. Add the rest of the ingredients. Stir to combine, bring to a boil and let simmer for 30+ minutes.
  3. Garnish with fresh parsley, tortilla chips, sour cream, avocado and/or cheese. Enjoy!


Saturday, March 1, 2014

Vintage Map Restroom Sign People

I am originally from the Puget Sound area. I was born in Seattle, and have spent most of my life within thirty miles of the city. My husband was born in rural Korea, and moved to the United States not long after he turned two. I saw this product on Pinterest, and thought it would be fun to make one from the places that James and I are from.

Remember those vintage map restroom sign people I printed and cut out at work the other day when I should have been grading? This is what they ended up being. It's a super simple project.

Materials:
  • vintage maps (printed from the internet)
  • restroom sign people template (also printed from the internet)
  • scrapbook paper of your choosing (I used some scrap snake-skin looking paper)
  • picture frame (mine is 7" square)

First, I cut out the templates and traced them onto the maps. Then I cut out the maps. It was then just a matter of cutting the scrapbook paper to fit in the frame and gluing the two little people down. Easy, peasy, done!


I'm going to leave it by James' desk and see how long it takes him to notice it...ahem, I mean surprise him with it...before I find it a home on one of our walls.